
For those unfamiliar with this game style, this was from the days when computers ran DOS and USB sticks were called floppy disks, even though they were not that floppy.
The poster child for this style of game was Zork.

In the absence of graphics, the adventure was text-based, testing wits over hand-eye coordination and the player’s patience in finding the specific phrase that would move the plot along.
Inspired by this genre of my youth, over ten years ago, I created “Lost in Redmond”, an interactive fiction game (also referred to as text-based adventure) using Dynamics Dialogs.

Sadly, not seeing the potential for Dialogs, Microsoft removed them from the product a couple of years ago. My ambition for using Dynamics as a platform for text-based adventures was dashed…until now.
Thanks to Power Virtual Agents (PVA), Lost in Redmond is reborn and, while, for reasons I will explain later, it is not quite possible to release it publicly. The good news is this blog will show you how to create your very own (and run it in Teams).

The Development Environment
Even as an MVP I struggled to get a non-trial environment to play with. Thankfully, firing up Power Virtual Agents in Teams worked without complaint so this is where I put it together. To get to it, simply click on the three dots in the left hand column in the Teams screen and search for Power Virtual Agents.

Elements of the Power Virtual Agent

The two main elements to a Virtual Agent are Topics (things to talk about) and Entities (linguistic concepts to help the AI understand what is being said). For my bot I did not need to use Entities but, if you want more information, here is an article Microsoft have put together describing them. Please note, PVA entities are completely different to what us Dynamics old-timers think of as Entities (what are now called Tables).
Topics

For the purpose of the game, most Topics represented the ‘rooms’ the player could occupy. In my game there were five different areas from the Microsoft campus:
- Building 7: Bill Gates’ Secret Bunker (this is a small in-joke in that there is no Building 7 at the Redmond Campus)
- Building 33: Executive Briefing Center
- Building 87: Microsoft Library
- Building 92: Company Store and Visitor’s Center
- Building 99: Microsoft Research
Other than Building 7, the rest are real buildings, although their purposes are mostly different in real life e.g. Building 87 is actually a research lab.
At the bottom of the screenshot you see the default Topics. These are part of all Virtual Agents and, as far as I can tell, cannot be removed, although they can be edited.
Finally, there are the “Welcome”, “Help”, and “Reset Inventory” Topics. “Welcome” is, effectively the splash page for the game, being triggered by the expression “Lost in Redmond”. “Help” was there to give overall guidance and then return to the game, and “Reset Inventory” was useful for game testing when I wanted to wipe the inventory of the player.
Welcome
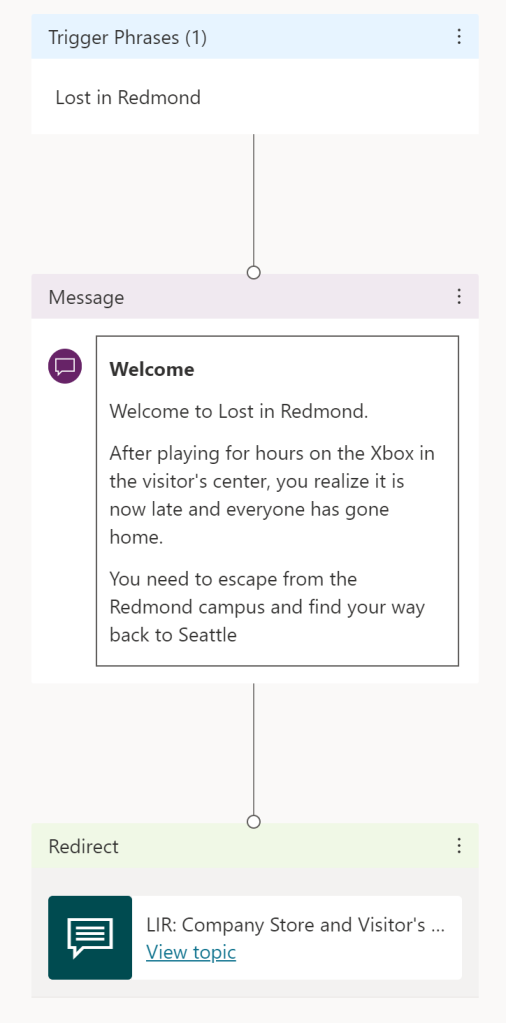
This Topic is a great introduction to the anatomy of a Topic. Firstly, we have the trigger phrase; this is what we say to our Virtual Agent to provoke the Topic response. In this case I have just one phrase “Lost in Redmond” but you can add as many as you like so the AI has the best possible chance to infer the right Topic. For example, I could add “Play Game” or “Play LIR” etc. to the list.
Next is a Message which has simple text formatting and then we have a Redirect to another Topic: Building 92. The Redirects were how I controlled the flow of the game, bouncing the player between Topic/rooms, collecting and using objects along the way.
Building 87: Microsoft Library
Most of the rooms had a similar structure but the Microsoft Library has all the elements seen elsewhere so this is good to describe flow within a Topic/room.

Here is the first half of the Topic. Like the Welcome Topic, we start with a Message, where we describe the room, and then ask a Question to prompt for an action. The “Go to <x>” responses use Redirects to go to other Topics as we did with the Welcome Topic and, similarly, those Topics redirect here so there is no need for a trigger phrase.
Help
Help triggers the Help Topic and then returns to this question.

To bend the flow back to the question, you hit the ‘+’ as if you are going to add another step and then grab the purple dot with the mouse.

Dragging this dot to the top of the original question, makes the flow return.
Inventory And Its Flows
Implementing a player inventory proved quite hard because variables in Power Virtual Agents are just plain horrible. Being used to Power Automate variables, I was expecting similar functionality. Specifically, I was expecting to be able to Initialize a variable, Set a variable, and Append to a variable. While it is possible to initialize a variable and give it a value, there is no way to reset that value or append it. For the curious, a variable is created whenever a Question is asked to store the response. You can also initialize a variable by calling a Power Automate flow.
Given the limitations of variables in PVA, I had to get creative which meant using Power Automate flows. Here are all the flows I created for the game.

- Check Inventory simply checks what is in the inventory list.
- Check for Item queries the Inventory list to see if an item is there.
- Reset Inventory, as previously mentioned, wipes the Inventory list.
- Activate Coat Hanger was me experimenting to see if I could store the Inventory with Booleans but it failed.
- Add a row to an Excel file added an item to the Inventory list and gives away the approach I eventually adopted; storing the Inventory in an Excel file.
Check Inventory
Here is the flow to Check Inventory. The Excel file simply has a Table with two columns: Name and Inventory, capturing the items all players have.

The flow takes the player’s name as input (auto-captured by PVA), pulls the list of all rows in the Excel file, filters them based on the Name and appends the Inventory values to a string which is passed back to the PVA.
Check for Item
Check for Item uses effectively the same structure taking the player’s name and the name of an item as input and then using both to filter the rows. Those which match get added to the string variable and the length of the string is passed back to the PVA.
Add a Row (Add an Item)
Add a Row takes the player’s name and the name of an object and adds it as a row to the Inventory Table.

I return a Status value back to PVA but, to be honest, I do not use it.
Reset Inventory
Finally, the Reset Inventory lists the rows and then does a delete Action for each one.

It is this use of an Excel file to store the inventory which make it difficult to package or expose the PVA to the outside world because it needs to sit somewhere to be used and cannot be added to a solution. Hopefully, Microsoft will improve the variable functionality of PVAs in the future and allow the game to be fully packaged.
Get Object
This is how the Get Object command looks like in the Topic. On selection of “Get Object”, the object in question is confirmed and then a flow adds it to the inventory Excel Table.

Use Object
This one is longer and does the following steps:
- Confirms the Object to use
- Shows the player their current inventory (via flow)
- Checks if they have the Object in their inventory (via flow)
- If the returned string is longer than zero characters, they have the object and can proceed. If they do not have the object they are redirected back to the main menu of options for this Topic.

One problem I had with using Excel as an approach was caching. Sometimes, despite an Object being added to the inventory and displaying as such with the Check Inventory flow, the Check Item flow would fail. I managed to improve it by using the looping approach above to filter the row queries, rather than using an ODATA Filter but it was still not bulletproof. Hopefully, this will improve with future versions of the flow Actions.
Testing and Publishing the Game
Testing is available at any time through the Test Bot

Publishing is through the Publish area and allows you to make the game live, add the bot to a Team (where you “@” the name of the PVA and pass it commands) and generate a link you can give to others to access the game.

Clicking on the generated link allows the person to add Lost in Redmond to Teams on the left hand side of Teams and run it in its own window, as we saw at the start of the article.
Other channels are also available, with a Premium license.

How Easy Is It To Make a PVA?
If you have tinkered with Power Automate you will have no problems with PVA. This was literally my first Virtual Agent and took me a few nights in front the tv to put together. While it might not be a game you create, there is a lot of potential for a chatbot which can use Power Automate to go off and retrieve answers to questions.
Have a play and, as soon as Microsoft fix variables in PVA, I promise I will release Lost in Redmond.
