For those of us who play with Microsoft Business Applications, licensing can be rough sailing. Plans change and there are gray areas everywhere. If you ask a dozen Microsoft staff whether your interpretation is correct, you are likely to get two dozen different answers back. I touched on this a little bit when I discussed the licensing of the Dynamics 365 App for Outlook (these days I am convinced you CAN use the app with a Power Platform license but it is not exactly clear).
Given I wrote that piece on Outlook almost three years ago, I wondered if the licensing landscape or the tools to navigate it had improved. It turns out one thing now has changed; we have Bing Copilot.
Bing Copilot can Read PDFs
As well as answering questions on web sites, you can open a PDF file in Edge, and Copilot will review the content and answer questions on it, almost instantly. At the time of writing, this is the link for the latest Dynamics 365 Licensing Guide. At 63 pages, I am more than happy for Copilot to navigate the clauses, footnotes and tables instead of me.
So how did it go? The first test was to see if it could read a table. Browsing through the document, I found the section below relating to Operations.
When asked to interpret this table, Copilot successfully managed to do so, informing me the Purchasing Operations Table is ‘PURCHLINE’ (who knew?!?).
My next test was to read the bullet point licensing tables in the document. This time I wanted a negative response so I asked if Team Members can use Assistant Cards.
Copilot nailed it and even gave some context as to why.
Now the big test. Do you need a Dynamics 365 module license to use the Dynamics 365 App for Outlook. To keep it relatively simple, I asked in the context of the Team Members license and got back a great answer…
but if I neglected to specify to ONLY look in this document, Copilot went off to the web and pulled answers from non-Microsoft blogs. The answer was almost the same but keeping it in the document meant it referred to Appendix C for further details and ensured I was getting information directly from Microsoft.
So What if Copilot Gets it Wrong?
While Microsoft’s Copilot Copyright Commitment offers little protection (I asked Copilot and it confirmed this was the case), Copilot assures me a simple misinterpretation is unlikely to lead to legal action, which is good to know.
As discussed in my previous article on AI, common sense, as provided by a human, should prevail. As Edge Copilot provides sources (and links to where it read the information in the document) it makes sense to double-check these before committing dollars to licensing. However, as a tool for quickly reading through a jargon-filled document and pointing me to the key places of interest on a specific topic, I see this as a very useful tool.
I recently did my annual pilgrimage to Seattle to attend the Microsoft MVP Summit (I am in the middle, just left of the logo).
While all the talks are under NDA and, therefore, I cannot talk specifics, I do not think I am giving too much away by saying Microsoft are investing heavily in AI services, which they generally refer to as ‘Copilot’. Some of the Copilot capabilities we can already see in demo versions of products like Dynamics 365 Customer Service where AI performs tasks such as:
Summarizes a Case for us
Suggests email topics and the content for those emails
Allows for plain English enquiries of the knowledge base via a chatbot
Broadly speaking, Microsoft’s Copilots either summarise existing data (Case records, KB Articles etc.) or suggest next actions (suggested emails to send). These may be great time savers but, as Microsoft admits, still require a human to verify the summary is correct or the action is appropriate. This is why the bots are called Copilot; the user is still driving.
The reason we cannot put AI in the driver’s seat? In short, AI ‘hallucinates’. With limited or ambiguous data or with questions asked of it without full context, the responses may not be completely accurate. It was pretty easy for me to generate an example of this. I asked Bing’s Copilot who I am on ‘GPT-4 Precise’ mode.
The second area is pretty accurate. The first is pure fantasy and is a description of the actual founder of TRIBE, Leon Burman with the text taken straight from the TRIBE web site. Thankfully, assuming the reader is diligent, they can click through on those numbers to review the sources of the information. Because the provenance of the data is clearly laid out, we have a way of checking the veracity.
For Dynamics, this is not the case and all the disclaimers in the world will not protect Microsoft for the fall out if it goes awry.
Using a Dynamics 365 90-day demo I happen to have lying around, let us explore some examples.
Data Summaries
Here is a Case Description I put on a Case in Dynamics 365 using a File Note format.
The Copilot summary was:
This description is not accurate with Copilot inserting a fictitious Customer and wrapping the description around a fictitious interaction between this Customer and their supplier, rather than ours.
Yes, there is a disclaimer on the summary and, yes, we can give it a thumbs down but there is absolutely no reference to where the data is coming from. In fact, they only way to find out is by being an administrator and heading into Customer Service configuration area.
Without knowing the eight fields being used, a user is compelled to review the entire Case every time they open one to ensure the Summary is accurate. This kills any time-saving provided by the Summary in the first place.
As we can see above, email and conversation data are also considered in the summary. What if multiple people have touched the Case? Will Copilot tell me I spoke to a customer about something when, in fact, it was a completely different user? Will I trust my memory (which may be difficult in a high volume call center), do I trust Copilot, or do I review potentially hundreds of actions in the Timeline to be sure? Provenance, if only for the user’s sanity, is essential.
Action Suggestions
One of the options available for emails is to express empathy to the complainant. As we can see below, the content gets confused in the same way as the Summary. What is worse here is this is going out to the complainant and will likely anger the supplier more, rather than reassure them.
To Microsoft’s credit there is a sources option at the bottom of the suggested email text but, it is not much help and is, in fact, misleading. Rather than say it came from the Case Description, it suggests context came externally.
In the case of Copilot suggesting next best actions, is this based on all sales made to an Account, including those of other departments whose sales processes may be completely different? Is it just my data? Again, provenance would be good to understand the context of the recommendation. What is more, if there is a poor assumption hidden in the recommended action, and the user unwittingly does it anyway, will this reinforce the recommendation for others, training everyone to make the same mistake or the same unnecessary action?
The Need for Provenance
Generally speaking, those of us who have used tools such as ChatGPT or Bing Copilot know we must be careful in trusting the information provided, bringing our own critical thinking into the mix. There is no reason to expect the tools inserted into Microsoft’s products such as Dynamics 365 to be any different. Therefore, it is essential those tools give the user every opportunity to verify what they are seeing is correct by the more efficient means possible.
Without data provenance we are making users’ life harder, not easier as they wade through screens of data to ensure what is being said is correct. We may unwittingly anger our customers and Copilot may try to gaslight us, with no practical way for us to confirm the reality of the situation. Finally, by leaving it up to Copilot to recommend the best way to sell or resolve cases, we could be making users less efficient, carrying out common but unnecessary steps. Transparency is essential provided by clear data provenance for all summaries and recommendations provided by Copilot.
For Part One where we set up the AI service, go here.
With the trained AI service now set up, we need to link it up for interaction. For my Aussie Spider Bot, I used Twitter but Twitter are now charging for an API which can read Tweets (Thanks Elon!) rendering my Spider Bot useless as it does not know when someone posts an image for review. It also killed my Dynamics 365 Tweet bot which I used to curate messages about Dynamics 365. I think this move by Twitter is really ill-conceived and such a killer of innovation. It promotes noise over analysis, something Twitter has plenty of already.
Because Twitter was not an option, I used email. Here is the Flow.
The Trigger and Structure
Rather than monitoring Twitter for a hashtag, we just need to trigger when we get an email in the inbox. There is an option to only trigger on emails with an attachment but, I have not tested whether it will still work with embedded images if I enable this so I have allowed the trigger to work on all received emails. Given it is an email address whose sole purpose is reading AGP graphs, this is not a big deal.
We have two variables, both strings: Email Body which contains the HTML which will be used for the body of the response, and Prediction String which is a text string containing all of the tags identified by the bot for the image.
Finally we have a loop for the attachments associated with the email. While there will usually only be one attachment, the Flow accommodates multiple attachments, sending one reply per attachment.
The Attachment Loop
In the attachment loop, we
Reset our two variables
Generate the list of predictions and put them into the Prediction String variable
Put some preamble text into the email body, introducing the bot
Go through the tags and add to the email body, as needed
Send the response email
Extracting the Predictions
Arguably the trickiest to set up, this set of steps calls the Azure Service and converts the tags into a string.
The key points of note here are:
The attachment is in “Base64” format (a fancy was of saying it has been converted into text so it can be sent via email). This needs to be converted to Binary via the base64ToBinary function
The Predictions are returned from the service in JSON format. For this to be readable by Power Automate, we need to use the Parse JSON step. This step also needs a sample schema. This can be readily obtained by creating and running the Flow up to the previous step and copying the output of the “The Predictions in JSON” Compose step immediately before it.
The ProjectID can be obtained by going to the customvision.ai site, entering your project and looking at the URL. The text circled below (and blacked out) is what you are after
The Published Name is the latest published Iteration from training. This will usually be in the format “Iteration#” where “#” is a number.
For the Connection for the service you will also need a Prediction Key and Site URL. This is very easy to locate these days. Go to the Performance tab in the customvision.ai screen and click Prediction URL. This will show what you need. The blacked out part in the below image is the Prediction Key and the site URL is the web address just above it.
Once we have a set of Flow-friendly predictions we can loop through them and find then ones with a sufficiently high probability to be included on our list. In my case I set the threshold to 0.5 (out of 1).
I have also included a Compose step at the end for easy reference on the Flow.
Reviewing the Tags
While you could do this with a loop, given the limited number of tags, I did this with If-Then steps.
In my case, for a given pair of high and low tags, each one was meaningful but so was if both appeared in the predictions list, so this had a nested If-Then as well.
The fact that combinations of tags was also meaningful, also steered me towards a set of If-Then statements over looping. In each of the three outcomes the email body was appended to with appropriate HTML.
Sending the Reply Email
The final step was sending the reply email.
With the body dynamically constructed through the Flow, this was relatively straightforward.
The Result
The result is a Flow which waits for an email to arrive in the inbox of AGPReader@hotmail.com sends the associated attachments to the trained Azure Custom vision service, which replies with tags. The flow then takes these tags and adjusts the body of the response email before replying back. All up the process takes up to 20 seconds to run which to me was very impressive.
Thoughts and Conclusions
That is literally all there is to the bot. As mentioned in Part 1, sourcing the images and tagging them took most of a Sunday. Training ran overnight, and the Flow was put together in the evenings of the following few nights. Literally zero code, running on a free plan, and in my opinion, lightning fast.
There is so much potential here in this technology for encoding the knowledge of professionals (in this case medical ones) into a bot for places where such professionals may not be readily available, all in a matter of days without code. I am very excited to see what comes out of this very accessible technology.
Three years ago I built the “Aussie Spider Bot”: a bot using Azure AI which could take a picture and determine if it contained a Redback Spider. It worked really well. Now I have used the same principle to build an “AGP Reader” which is effectively a medical image reading/assessment bot. What is remarkable is it only took me a few days part-time and required zero lines of code. Given this is the case I thought I would walk through the process so others can do similar things.
Given the length of the setup walkthrough, I have split this blog into two parts: This part which walks through setting up the bot and the second part which explains how to connect it to Power Automate.
What is an AGP Graph?
This is an Ambulatory Glucose Profile (AGP) graph. It is effectively a heat map for blood glucose levels (BGLs) for people with diabetes. To create it, you take BGLs over a number of days and then look at where the values most commonly fall; dark blue is the most frequent occurrence, light blue less so. The green area is the ‘safe range’ where values should ideally sit.
In the above we see that I (yes, this is from my data) tend to spike around 14:30 and also at 21:30. It is fairly easy to work out this is due to meals (lunch and dinner). Why no breakfast spike? Generally I do not eat breakfast.
This graph is something many people with diabetes generate once every, say, three months, as part of their visit with their health care team (endocrinologist, diabetes educator etc.) The interpretation I did in the previous paragraph is usually left up to the health care team who then talk about ways to improve the curve e.g. adjusting how insulin is being used, adjusting meals etc.
My aim was to see if I could create a bot which identified the same spikes and also provided feedback (Spoiler Alert: I could and it works great).
Setting Up the Bot: Azure Custom Vision
The pattern was effectively the same as the Aussie Spider Bot: Train Azure AI on imagery and then hook it up to a comms channel to receive imagery and return the analysis (via Power Automate). While I could have used AI Builder to link the two, I find it easy enough to link them manually.
The first step is to go to the Azure Portal (sign up for a free trial and credit if needed) and provision a Custom Vision service.
Clicking Create brings up the setup screen.
Key fields of note:
Resource Group: This is just a way of grouping Azure resources together for analysis of costs. Pick any group/create a new one.
Region: Different regions have different pricing tiers so shop around, especially if you are looking for a free plan
Name: The name of your bot
Training/Prediction Pricing Tier: In the above I was unable to select the free plan because it was already in use (with the Aussie Spider Bot) but you should be able to.
It should also been noted that we are, in fact, provisioning two services (yes, selecting both at the top of the setup screen is the way to go): a training service where we get the bot to learn and a prediction service where it uses that learning to draw conclusions.
Once done, hit the “Review and Create” and you will have your bot set up and eager to learn.
Where is my Bot?
At this point I struggled to work out what to do next. I had a bot but it was not obvious where to go to train it.
In fact, if you scroll down the page, Step 2 (which really, really should be Step 1 because calling an untrained service makes no sense at all) tells you where to go:
Clicking the blue link sends you to customvision.ai where you can set up your bot (you will have to log in again with the same credentials as Azure).
In my case, because I was keen to use the free pricing tier, I created the AGPBot as a second project under the original Aussie Spider Bot service. If you are creating it fresh, you create a new project.
Most of this is about setting up the kind of bot you want:
Project Type: Classification will categorise the image (what I wanted for mine) whereas Object Detection finds the location of specific objects within an image e.g. a bird in a national park photo
Classification Types: For the Aussie Spider Bot I used Multiclass but, in this case, as an image may have multiple tags associated to it, I chose Multilabel
Domain: The kinds of objects we are working with. As mine did not obviously fit another category I chose “General [A2]”
When done, click the “Create Project” button.
Setting up the Project
We are now ready to train our bot. Opening the project gives us the main areas we will work in:
Training Images: Where we add tags, images and link the two
Performance: Where we review the effectiveness of the bot and publish it
Predictions: Historic predictions made by the bot
Train: Where you initiate the training of the bot
Quick Test: An area where you can try out your bot, once trained
Let us go through the relevant ones:
Training Images
The first step is setting up the tags. I had ten positive tags and one negative tag. A negative tag is used for a null result i.e. none of the positive tags apply. I then uploaded my images for training and went through the exercise of clicking through each one and classifying it with the tags.
Once all the images are tagged, we are ready to train. Click the Train button.
The simplest way is to select Quick Training and, for the Aussie Spider Bot, this is what I used. However, the AGP Bot needed more refining so I selected Advanced Training and set it to 24 hours. In fact it usually ran for 8-12 hours but the results were much better than the Quick Training.
After it completes, you can go to the performance tab to see how the bot is shaping up.
Each training generates an “iteration” which can then be published and accessed by things like Power Automate. The circled “i”s give specific meanings to Precision, Recall, and AP but, for me, I just accept these are measures of accuracy/performance and consider the overall percentages as a measure of that. To improve the numbers, you can look at the performance of individual tags and, generally, throwing more images at the problem will help. In the case above, adding more images which have a low BGL at dinner would help train the model.
To see the model in action, we can now go to Quick Test.
Here you can try a sample image (ideally one the bot has NOT been trained on) to see if it yields the desired results. In my case, I trained on 150 images and reserved 10 for testing. Once I had refined the tags and added enough images for the 10 testing images to work, I was confident the model was ready to go.
Conclusions
There you have it, how to set up an Azure AI bot. In my case, the longest parts of the process were sourcing the images and individually tagging them; that part took most of a Sunday with the Power Automate Flow being finished over the next couple of nights. Other than that, the process was straightforward. As with the Aussie Spider Bot I will end this post with an xkcd comic from 2014.
What was “virtually impossible” 10 years ago is simple today and, as per the instructions in this blog, completely codeless. The only thing stopping us is not realising how accessible this technology is. If you have an idea, like I did with the AGP graphs, have a play. You will not regret it.
Two events I attended over the last few weeks inspired this post. The first was Microsoft’s MVP Summit which they held in person for the first time in four years. The second was a Zoom call for a product called getmee which uses AI to help coach people in their communication skills.
Let us start with ‘Summit’. While the contents of the conference are under strict NDA, I do not think I am revealing too much by saying AI technologies had a strong presence. After all, Microsoft Copilot for Office has been announced, as has Copilot for Bing. In both these cases, a conversational AI bot (you may know it as ChatGPT), has been added to Microsoft applications to provide an ‘assistant’ while you work. If this sounds like the Clippit of old, while I am sure AI-purists would cringe at the comparison, it is a fair analogy. While you create an email, Copilot offers to generate the body of the email for you, adjusting the style of writing as you see fit.
I have no doubt Copilot will bring massive productivity gains to the office.
In the case of getmee, this is the brainchild of Balendran Thavarajah, a former client of mine from a little over ten years ago. Back then ‘Bala’ was a quietly-spoken, friendly development lead for a not-for-profit organisation I was working with. Today, he is the founder and CEO of getmee, a ‘personal AI coach that teaches users to speak more clearly, directly and effectively.’ Essentially, Bala had been inspired by his personal experiences arriving in Australia as a refugee with limited English. In his Zoom presentation he spoke about having sought-after skills in the market but felt his communication skills at the time hindered his ability to land roles. To ensure this did not happen to others, he created getmee.
As with Copilot, I am very excited about getmee, and products like it. I have no doubt getmee will empower people to pursue their dreams, and be more satisfied in their work.
There is an elephant in the room though with these technologies which is glossed over and is the seed for this article: products derived from ChatGPT are primarily for the English-speaking market. While it is true ChatGPT supports over 50 languages, as the source material for a language diminishes, the harder it is for an AI bot to be trained on it.
English is an excellent source of training material because it is the lingua franca of the internet and for code development. Literally over half of the material on the internet is in English i.e. there is more English content on the internet than all other languages combined.
As AI applications become more specialised, the relevant training material diminishes and, while, this is less of a problem for English due to the enormous amount of content available, it becomes a significant problem for other languages. Of course, for many countries whose primary language is not widespread, the citizens have already learned to adopt the language of their neighbors, and, what is arguably the language of business in much of the world, English. My concern is these ‘regional languages’ will become a cultural afterthought, accelerated by tools which promote excellence in productivity and communication in English.
It is a difficult problem, and certainly not the fault of the products mentioned above, which serve very real needs in English-speaking countries and countries who conduct business in English. Elsewhere though, people will be left behind. India is a great example. It is true India uses English for the language of business but only around 20% of the country speak some level of English (the percentage varies between 10-30% depending on the source.) Hindustani or ‘Hindi’ is much more widely spoken with at least 50-60% of the population speaking it to some level. In the northern half of India, this percentage is much higher and approaches 90-100% of the population. However, Hindi only makes up about 0.1% of the content on the internet.
This is why I describe AI as oscillating the digital divide. A product like getmee clearly benefits citizens in countries where English is the language of business, providing access to technological jobs which would be otherwise inaccessible, narrowing the digital divide and benefitting all. However, for a country whose citizens have limited English, they will be locked out of this new generation of productivity tools, widening the digital divide.
It would be lovely to end this article with a simple solution to address my concerns but big problems rarely have simple solutions. English language skills will continue to be the price of entry for many professional jobs around the world, and continue to be the basis for much of the world’s internet-based technologies. Where there is opportunity is in recognising this and supporting countries who are likely to be hampered the most by this trend. In the case of India, finding those rich veins of Hindi content and digitising them for use by AI will make crores of rupees, if not kharabs, for those willing to pursue and commercialise it.
For those unfamiliar with this game style, this was from the days when computers ran DOS and USB sticks were called floppy disks, even though they were not that floppy.
The poster child for this style of game was Zork.
In the absence of graphics, the adventure was text-based, testing wits over hand-eye coordination and the player’s patience in finding the specific phrase that would move the plot along.
Inspired by this genre of my youth, over ten years ago, I created “Lost in Redmond”, an interactive fiction game (also referred to as text-based adventure) using Dynamics Dialogs.
Sadly, not seeing the potential for Dialogs, Microsoft removed them from the product a couple of years ago. My ambition for using Dynamics as a platform for text-based adventures was dashed…until now.
Thanks to Power Virtual Agents (PVA), Lost in Redmond is reborn and, while, for reasons I will explain later, it is not quite possible to release it publicly. The good news is this blog will show you how to create your very own (and run it in Teams).
The Development Environment
Even as an MVP I struggled to get a non-trial environment to play with. Thankfully, firing up Power Virtual Agents in Teams worked without complaint so this is where I put it together. To get to it, simply click on the three dots in the left hand column in the Teams screen and search for Power Virtual Agents.
Elements of the Power Virtual Agent
The two main elements to a Virtual Agent are Topics (things to talk about) and Entities (linguistic concepts to help the AI understand what is being said). For my bot I did not need to use Entities but, if you want more information, here is an article Microsoft have put together describing them. Please note, PVA entities are completely different to what us Dynamics old-timers think of as Entities (what are now called Tables).
Topics
For the purpose of the game, most Topics represented the ‘rooms’ the player could occupy. In my game there were five different areas from the Microsoft campus:
Building 7: Bill Gates’ Secret Bunker (this is a small in-joke in that there is no Building 7 at the Redmond Campus)
Building 33: Executive Briefing Center
Building 87: Microsoft Library
Building 92: Company Store and Visitor’s Center
Building 99: Microsoft Research
Other than Building 7, the rest are real buildings, although their purposes are mostly different in real life e.g. Building 87 is actually a research lab.
At the bottom of the screenshot you see the default Topics. These are part of all Virtual Agents and, as far as I can tell, cannot be removed, although they can be edited.
Finally, there are the “Welcome”, “Help”, and “Reset Inventory” Topics. “Welcome” is, effectively the splash page for the game, being triggered by the expression “Lost in Redmond”. “Help” was there to give overall guidance and then return to the game, and “Reset Inventory” was useful for game testing when I wanted to wipe the inventory of the player.
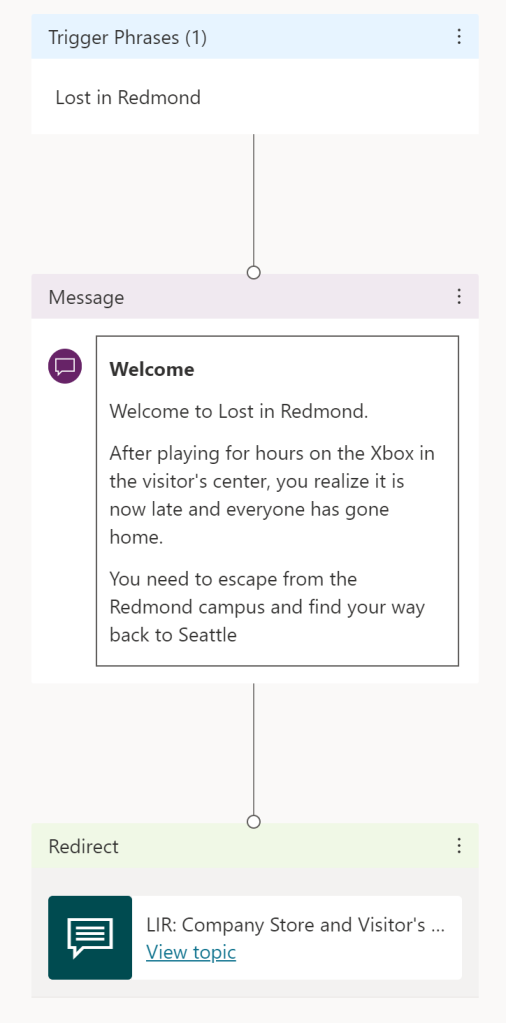
Welcome
This Topic is a great introduction to the anatomy of a Topic. Firstly, we have the trigger phrase; this is what we say to our Virtual Agent to provoke the Topic response. In this case I have just one phrase “Lost in Redmond” but you can add as many as you like so the AI has the best possible chance to infer the right Topic. For example, I could add “Play Game” or “Play LIR” etc. to the list.
Next is a Message which has simple text formatting and then we have a Redirect to another Topic: Building 92. The Redirects were how I controlled the flow of the game, bouncing the player between Topic/rooms, collecting and using objects along the way.
Building 87: Microsoft Library
Most of the rooms had a similar structure but the Microsoft Library has all the elements seen elsewhere so this is good to describe flow within a Topic/room.
Here is the first half of the Topic. Like the Welcome Topic, we start with a Message, where we describe the room, and then ask a Question to prompt for an action. The “Go to <x>” responses use Redirects to go to other Topics as we did with the Welcome Topic and, similarly, those Topics redirect here so there is no need for a trigger phrase.
Help
Help triggers the Help Topic and then returns to this question.
To bend the flow back to the question, you hit the ‘+’ as if you are going to add another step and then grab the purple dot with the mouse.
Dragging this dot to the top of the original question, makes the flow return.
Inventory And Its Flows
Implementing a player inventory proved quite hard because variables in Power Virtual Agents are just plain horrible. Being used to Power Automate variables, I was expecting similar functionality. Specifically, I was expecting to be able to Initialize a variable, Set a variable, and Append to a variable. While it is possible to initialize a variable and give it a value, there is no way to reset that value or append it. For the curious, a variable is created whenever a Question is asked to store the response. You can also initialize a variable by calling a Power Automate flow.
Given the limitations of variables in PVA, I had to get creative which meant using Power Automate flows. Here are all the flows I created for the game.
Check Inventory simply checks what is in the inventory list.
Check for Item queries the Inventory list to see if an item is there.
Reset Inventory, as previously mentioned, wipes the Inventory list.
Activate Coat Hanger was me experimenting to see if I could store the Inventory with Booleans but it failed.
Add a row to an Excel file added an item to the Inventory list and gives away the approach I eventually adopted; storing the Inventory in an Excel file.
Check Inventory
Here is the flow to Check Inventory. The Excel file simply has a Table with two columns: Name and Inventory, capturing the items all players have.
The flow takes the player’s name as input (auto-captured by PVA), pulls the list of all rows in the Excel file, filters them based on the Name and appends the Inventory values to a string which is passed back to the PVA.
Check for Item
Check for Item uses effectively the same structure taking the player’s name and the name of an item as input and then using both to filter the rows. Those which match get added to the string variable and the length of the string is passed back to the PVA.
Add a Row (Add an Item)
Add a Row takes the player’s name and the name of an object and adds it as a row to the Inventory Table.
I return a Status value back to PVA but, to be honest, I do not use it.
Reset Inventory
Finally, the Reset Inventory lists the rows and then does a delete Action for each one.
It is this use of an Excel file to store the inventory which make it difficult to package or expose the PVA to the outside world because it needs to sit somewhere to be used and cannot be added to a solution. Hopefully, Microsoft will improve the variable functionality of PVAs in the future and allow the game to be fully packaged.
Get Object
This is how the Get Object command looks like in the Topic. On selection of “Get Object”, the object in question is confirmed and then a flow adds it to the inventory Excel Table.
Use Object
This one is longer and does the following steps:
Confirms the Object to use
Shows the player their current inventory (via flow)
Checks if they have the Object in their inventory (via flow)
If the returned string is longer than zero characters, they have the object and can proceed. If they do not have the object they are redirected back to the main menu of options for this Topic.
One problem I had with using Excel as an approach was caching. Sometimes, despite an Object being added to the inventory and displaying as such with the Check Inventory flow, the Check Item flow would fail. I managed to improve it by using the looping approach above to filter the row queries, rather than using an ODATA Filter but it was still not bulletproof. Hopefully, this will improve with future versions of the flow Actions.
Testing and Publishing the Game
Testing is available at any time through the Test Bot
Publishing is through the Publish area and allows you to make the game live, add the bot to a Team (where you “@” the name of the PVA and pass it commands) and generate a link you can give to others to access the game.
Clicking on the generated link allows the person to add Lost in Redmond to Teams on the left hand side of Teams and run it in its own window, as we saw at the start of the article.
Other channels are also available, with a Premium license.
How Easy Is It To Make a PVA?
If you have tinkered with Power Automate you will have no problems with PVA. This was literally my first Virtual Agent and took me a few nights in front the tv to put together. While it might not be a game you create, there is a lot of potential for a chatbot which can use Power Automate to go off and retrieve answers to questions.
Have a play and, as soon as Microsoft fix variables in PVA, I promise I will release Lost in Redmond.
A recent episode of “The Book of Boba Fett” showed just how far Deep Fake technology has come, resurrecting the character of Luke Skywalker as he was 30 years ago.
Deep Fake imagery (digitally superimposing someone else’s face onto another person) has been with us for a while and there are even phone apps which can achieve a simple version of it. What was remarkable about this rendition, for me, was the voice. Luke’s voice was, as it was, 30 years ago. Initially I had assumed they has used the same actor, Mark Hamill, and somehow de-aged his voice. In fact the voice was completely artificial. Geek Tyrant describes the process which involved feeding an AI with many, many samples of Mark Hamill’s voice from that time so the AI could recite the dialogue pitch perfect.
For now, Deep Faking is process heavy and time consuming. However, processing speeds continue to improve. The situation reminds me of Autotune.
How Autotune Changed Music
Autotune was invented in 1997 and is used to correct the pitch of singing. Using a mathematical method called autocorrelation, it does this in practically real time. Music engineers considered it impractical because of the massive computational processing required. The inventor, Andy Hildebrand, invented the technology for seismic wave analysis to pinpoint drilling sites and was thus unhindered by such preconceived notions. Using a “mathematical trick”, he greatly simplified the calculations required, thus reducing the necessary processing.
Today, autotune is used on practically every popular song as part of the sound engineering to make the song “play ready”.
Real Time Deep Faking
Let us assume similar “mathematical tricks” can be discovered for Deep processes. Obviously this allows for real time broadcasting of anyone pretending to be anyone else and potentially kills voice recognition security. I can see an era of politicians using stand-ins for speeches both live and recorded. Actors will ‘de-age’ their voices in the same way they ‘de-age’ their appearances with surgery. Audiences will be given a choice for who they want to see playing the parts in movies or presenting live events. Someone that looks more like them perhaps, or someone who they trust.
Mixed Deep Faked Reality
Now consider the combination of another nascent technology: mixed reality. We are seeing smaller and less invasive versions of Hololens and Oculus-like devices and we already have glasses with bone conducting headphones. Add in noise cancelling technology and it is not hard to imagine a world where we can auto-adjust reality’s sights and sounds to whatever we want. In this world we can Deep Nude everyone we meet; we can make everyone sound like anyone we choose. Perhaps we love the sound of our own voice and want to hear it from everyone else’s mouth or there is a figure we feel comfortable and relaxed with; the ultimate ice breaker at parties.
The is where the title of this article comes from. If you are unfamiliar with the artist Aphex Twin, the video to his song, Windowlicker involves a gentleman, and some associates in white bikinis, dancing and enjoying each other’s company in a limousine. The part of the video which is slightly disturbing is they all look exactly like him.
This notion of adjusting the appearance of those around us to our preference, depending on the circumstance, I believe, will become a natural part of our lives. For people we know, we may allow them to define their appearance. For strangers, the technology will adjust them to our preference, changing their appearance to highlight “high value” individuals, based on clothing brands, known importance from online presence etc. and I will leave it to the reader to consider what this technology means for realising fantasies in the bedroom.
For those otherwise reluctant to engage in social settings, I see benefit in lowering the social barriers; it has never been easier to picture a room of people without their clothes on, but I also see it making our world even more superficial. Are we really capable of determining a person’s true worth from their shoes and LinkedIn profile? What do we lose in removing someone’s physical presence to suit our own aesthetics? The technology will encourage us not to accept people for who they are, but for who we want them to be or who they are online which, for many of us, is a very rough approximation.
I am both excited and concerned at what this technology will bring and what it will take away but I also see it as inevitable.
A couple of weeks ago I put together a Flow for merging Word files. I mentioned at the time I was not overly comfortable with the approach. While the Flow worked fine, the design was not great.
Here we have an example of poor design from that Flow. The Flow splits based on whether the input is “CRM” or “ERP”. However, the processes are identical. If we need to make an adjustment to the process for one, we are likely to need to do it to the other and the double handling introduces room for error. Can we redesign the process and eliminate the double-handling? This is what is meant by refactoring: changing code (or, in this case, a Flow) so it does the same thing but it is more “elegant”.
Reasons to Refactor
Obviously, double-handling is one good reason to refactor or, to put it another way, “Maintainability”. We want to create a Flow which can be maintained easily in the future, either by us or someone else. If we need to remember to make identical changes in multiple spots in the Flow, this is not easily maintained.
Other reasons for refactoring include:
Readability: A Flow which someone can open and easily understand what it does
Scalability: A Flow which grows as its use or the volume of the information it works with grows
Reusability: A Flow which we can use in other circumstances so we do not have to reinvent/recreate
Performance: A Flow which runs efficiently
All of these apply to the Create Response Flow.
Readability
Let us look at the current version of our Flow which does effectively the same thing as before but redesigned to embrace these design principles.
First of all, every Action has a meaningful name. Without expanding them, I get a sense of what they do. I can also add comments to Actions through the ellipsis to explain more detail.
Finally, you can see a couple of brown Scope Actions. A Scope Action is used as a container for a collection of Actions. So, for example, the “Set up Substitution JSON” looks like this when expanded.
In this case, the Actions get a list from an Excel sheet and then does something with them and, based on the title of the Scope, it appears to be generating JSON for Substitution. For someone relatively familiar with making Flows this should be enough to put them on the right track.
Maintainability
Let us look how we read the files we are merging and how we merge them. In the original Flow we read the file contents of all possible Word files we were looking to merge into our response,
and then added them manually to the Merge Action.
Also adding a little bit of script to see if that particular file was to be included.
This is hard to maintain (for any file we need to add a Get File Contents action, add it to the Encodian Merge Action and also add a tick box to our Trigger inputs), hard to read (the Get File Contents Actions alone span multiple pages on screen), and is troublesome to scale (imagine Settings up the Flow for 100 potential documents). So what is the alternative?
First of all, I moved the list of potential files and the flag on whether to include them into an Excel sheet in a central location.
In the Flow we read the Excel table list of files and loop through them, checking to see if the Include value is set to YES.
The advantage of this approach is the list of files can change and the Flow is unaffected. We simply adjust the list on Excel and we are good to go.
Scalability
You will notice in the above image the final step is “Check if below message buffer size”. This refers to a limitation in Power Automate which hinders scaling the Flow to many documents.
Firstly, let us revisit the Encodian Merge CRM Word Documents step. You will notice a “T” in the top right of the configuration settings for the Action.
Clicking this toggles the configuration from an entry screen to JSON which looks like this.
If you are unfamiliar with JSON it is, for the purposes of this discussion, a structured formatting convention for the storage of information (I once likened it to XML because of this, much to the chagrin of a developer friend of mine). Because everyone agrees on the JSON standard, it is easy to pass JSON between Actions and, because it is formatted in a well defined way, we can construct our JSON and insert it into the Encodian step afterwards which is, of course, what our loop does.
In this case, the File Array is an Array variable and the loop keeps adding to it.
The reason for the buffer check? It turns out converting the file contents of Word documents into a format which is friendly for Arrays blows out the size and Power Automate will only let you add elements to an Array up to a certain size. So, the buffer check gets the length of the Array and the length of the new element to be added and checks whether combining them will be too large. If it is, a TEMP file is used to store the file contents and the Array is reset.
If it is not completely clear what is happening here, I merge the files already in the JSON Array variable (Merge Array Documents) and then merge this with the existing TEMP file I have in a Teams folder, rewriting back to the TEMP file with the additional content. In short, every time we hit the Array buffer limit, we merge and write the extra parts to a TEMP file.
Why don’t I simply merge for each file in the loop and not worry about building an Array in the first place? Because the licensing plan for Encodian gives me a finite number of Action calls per month so doing this, say three times as our Array becomes too big is better than doing it 30 times for the 30 Word documents I am looking to merge. This consideration of Encodian Action calls more falls under Performance so we will return to this later.
Reusability
The use of an Excel as a configuration file for the Flow also has the advantage that the Flow “engine” can be used elsewhere and, the more settings we put in the Excel file, the less rework we have to do to make it function. There is still some work to do on this front in the Flow. While the specific files used are now outside of the Flow, I still specify the Site Address and part of the File Path when retrieving the TEMP file. Ideally this would be stored in the Excel file and retrieved at the start of the Flow. In an ideal world there would be no settings in this Flow other than the location of the Excel configuration file.
To then transplant the Flow elsewhere would just need a copy of the Flow and the Excel configuration file in a convenient location. The only change needed to the Flow would be to point it to the Excel configuration file and you are good to go.
Performance
Performance is traditionally thought of as how quickly something runs. In this case the Flow speed is not a big consideration. The Flow takes about 10 minutes to merge 30 or so documents and that is ok. A bigger performance issue, as alluded to earlier, is the minimization of Encodian Action calls.
At the moment the Flow uses three Action calls at the end to merge the final File Array with the TEMP file and then perform a Search and Replace of pre-defined text substitutions (also configured in Excel in the Substitution worksheet with the JSON for the Action defined in the first Scope of the Flow, mentioned at the start).
It also costs us another two Action calls every time we reach the Array buffer limit and need to write to the TEMP file which is the loop we explored above. So, for a document which reaches the Array limit, say, three times, the Performance is 2*3+3 = 9 Encodian Action calls.
Defining Performance as a Flow which uses the least number of Encodian Action calls, I can see the possibility of reducing the number of calls further by writing a separate TEMP file each time we hit the Array buffer limit rather than merging them as we go. So, by the end of the major loop we might have TEMP1, TEMP2, and TEMP3 files and we merge these at the end. In principle, this would bring our calls down from 9 to 6 (1*3+3).
However, a new loop at the end to combine the TEMP files may be tricky to construct and make the Flow slightly less readable. This is an example where design principles are potentially in conflict and trade-offs need to be made.
Conclusions
It is very easy in Power Automate to write a Flow that works but is poorly developed. Refactoring ensures a Flow not only works but it is also well designed and has longevity. As you practice building Flows and reflecting on the values of Maintainability, Readability, Scalability, Reusability, and Performance what is poor design will become more intuitive. In these cases, consider how you can improve your Flow and refactor it. If you or someone else ever needs to revisit your Flow, I guarantee they will thank you for the effort.
With a quiet afternoon, following the holiday break, I set my mind to a task on my to-dos; creating a Power Automate Flow which merges Word documents into one combined document, all within Teams. How hard could it be? After all, it is two Microsoft Office files of the same type being merged into another file of the same type within Microsoft’s tool of choice for office collaboration. It turns out it is not straightforward but is possible. This is how.
The Motivation
Working in presales I write a lot of responses to requests for proposals/quotes etc. as well as providing general capability documents to sales folk. It turns out a lot of the content needed to answer these requests is the same. Over time, we have developed Word documents which cover the main topics. We have these in folders and draw upon them, as needed.
Until now, putting a response together involved getting a blank Word document and inserting the content of these source files. The plan was for the Flow to eliminate the manual stitching.
What Did Not Work
Initially I thought Power Automate would have a raft of Word Actions to choose from. It turns out this is not the case.
Making a PDF or populating a Word template with text, no worries. File manipulation, not so much. Even SharePoint and OneDrive Actions came up short. File content extraction was possible but merging was nowhere to be seen.
I thought, maybe, I could extract the file contents from two source files and then create or update a new file in some way but this also failed. I expect it might be possible to convert the File Content objects to a manipulation-friendly format, strip out headers and footers and merge the content through script and turn them back into a File Content object for file insertion but that smelled a little too much like code and so I looked for an alternative.
Encodian To The Rescue
While I wanted to keep things all things Microsoft (and non-Premium), I soon started considering third party options. However, being cheap, I also wanted something I did not have to pay for. Encodian came through with the goods.
This was the library of Actions I was expecting to have been built natively by Microsoft but beggars cannot be choosers.
With an Encodian Free Plan allowing 50 Action calls per month, this was going to meet my needs.
With the Actions I needed, I started putting the Flow together.
Where The Flow Appears
My hope was to call the Flow from the Teams folder but this proved impossible. While I could add the Power Automate tab to a Team, every time I hit the “New flow” button and created a Flow it would not appear.
Fortunately, I could see my Flows from the Power Automate icon down the left hand side of Teams which was fairly easy to add in (although I still needed to click the “View all flows” button to make them appear.
From here I could manually trigger my Flow “Create Response”.
The Trigger
The “Manually trigger a flow” Trigger did the job for me and the ability to add inputs also made life easier. Here we have:
Client Name: This is a text input used to set the final file name and to make text replacements through the document
CRM or ERP?: This is a text input (with drop-down options) as some templates have a CRM and ERP version
YES/NO options: These define which Word documents to pull into the final response document.
A word of warning here, while the inputs appeared as expected when triggering the Flow, once a YES/NO option was toggled on, it was impossible to untoggle it. If you no longer wanted a source document to be added in, you had to cancel the trigger and re-run the Flow. I tried to use text inputs instead but could not get the Power Automate Condition Action to accept <<input>> = “YES” as, for some reason, it did not accept the string input as being a string. Perhaps there is a simple fix for this but, as I could get it working with the YES/NO, I moved on. The enemy of progress is perfection.
Another word of warning here. The inputs appear in the order they were created. So, if they appear in the wrong order for you, your options are deleting and recreating them (and fixing up your Flow to point to the new input) or extracting the Flow, hacking the Zip file and reimporting it.
Get The File Contents
Next was to get the File Contents from all the source files. For this, I used the SharePoint “Get file content using path” action. This allowed me to browse the Team file structure to find the source files. I also had a placeholder blank Word document which I used a little further on in the Flow.
I found the final result was more stable if I also toggled the “Infer Content Type” advanced setting to “No”.
ERP Or CRM?
Next I split the Flow to construct the final document based on whether it was a CRM or ERP response.
The developers (both of you) who read this may be uncomfortable with this approach and that is fair enough. The idea of grabbing all the file contents first, then splitting the process into two paths which have a lot of commonality between them means we are grabbing file content we will not use e.g. we will not use ERP file content in a CRM response, and also means maintenance will likely have to be done twice in the two branches if there is an adjustment which applies to both types of responses. In my defence, my intention was to build a proof of concept so optimisation was a secondary concern. I do have it on my list to “refactor” the Flow down the track. One thing to consider is, of course, that we only get 50 Encodian Actions per month so, whatever our final design for the Flow is, we want to minimise the number of Encodian Actions.
Constructing The Document
The two branches follow essentially the same process so I will break down just one. To merge the content for the final document, we use the Encodian “Merge Word Documents” Action.
For each File Content previously extracted a little bit of script
triggerBody()[‘boolean_3’] refers to the input parameter
outputs(‘Get_00_Xxxx_Xxxxxxx_XXX_Xxxxxxxx’)?[‘body’] refers to the relevant file content
outputs(‘Get_Blank_File_Contents’)?[‘body’] is the default blank Word document file contents I mentioned earlier
This sees if the Trigger toggle was activated for that section of the document and, if so, brings it in to the response. You can construct the above script using the Expression builder and referencing Dynamic Content which makes life easier. Another small bug I noticed was the Expression builder was not popping up unless I put the Power Automate Builder in its own window with the “Pop out app” button in Teams – Power Automate.
Next I created the response file using the SharePoint “Create file” Action.
The File Name is simply the Client Name input with “.docx” concatenated to the end.
concat(triggerBody()[‘text’],’.docx’)
Again, this was fairly easy to construct with the Expression Builder.
The File Content is from the previous Encodian Action.
Feeling confident, I then used Encodian’s “Search and Replace Text” Action to set the client name in the final document. In our source documents, we used “[Client]” to refer to the client name so it was a case of taking the input Client Name and replacing everywhere “[Client]” was mentioned.
The Action can handle PDFs and Word documents so the File Type is specified, the Filename uses the same concatenation script as the file creation step. In writing this blog I noticed I used the same File Content reference as the file creation step and, therefore, we can probably remove the file creation step and create it after the text replacement. More refactoring.
As can be seen above, the Phrases Search Text is what we are looking for in the document and the Phrases Replacement Text is what we put in its place. In this case we replace it with the client name we got from the Trigger input.
Finally, we need to insert our manipulated file content back into the response file which we do with a SharePoint “Update file” Action.
The File Identifier is the Path from the “Create file” Action and the File Content is the content from the previous step.
The End Result
Once set up, you can go to Teams and the Power Automate icon on the left, bring up your Flows, and run the Flow from the ellipsis (three dots) on the right.
Up pops the trigger inputs which we complete and press “Run flow”.
After a little while (less than 10 minutes, usually 1-2) a new file will be created in the folder specified in the Create file action. This will combine all the source files selected and make the text replacements specified.
If anyone knows fixes for the bugs mentioned or other tips for merging Word documents, feel free to add them in the comments.
It is a poorly kept secret that Microsoft Business Applications licensing has some problems. This is a shame because the potential for the technology is immense and it is a constant source of frustration for those of us who work with the tools when innovation gets hampered by Microsoft licensing.
The classic problem is internal use rights for things like raising tickets. I mentioned this in my recent Pay-As-You-Go article where the new Pay-As-You-Go plan for Power Apps goes some way to fixing the frustrating solution that is/was Team Member licensing.
In this article I will tackle an issue that is actively preventing organisations moving to the Power Platform. I am sure other Microsoft partners have come across this issue as well and Microsoft needs to make it easier to transition to Power Platform, not harder.
A Common Business Problem
Organisations without a formal CRM system, often cobble together an informal “BONA” system (Business Cards, Outlook, Napkins, Access) to manage CRM activity but, as they grow, they realise they need something more centralised. BONAs work for individuals but make it hard to collaborate among employees and make it hard to get a detailed picture of a customer’s interactions with an organisation.
Activity management (also called Contact Management) is the first step towards managing this. Microsoft used to have the Business Contact Manager and this was then replaced with the Outlook Customer Manager but now there is no formal replacement.
The obvious choice is something built on Microsoft’s Dataverse.
How Dataverse Addresses the Challenge
For the purpose of this conversation, Dataverse is a stripped-down CRM database which applications sit on top of. Those applications can be ones pre-built by Microsoft (Dynamics 365 Modules) configured using the no/low-code Power Platform, or built from scratch with code, connecting to the Dataverse Web API.
Dataverse has a simple set of tables at its core which allow the management of business interactions. These tables include:
Accounts (organisations a business interacts with)
Contacts (individuals a business interacts with)
Activities (out of the box these include meetings, tasks, and phone calls)
Notes (and Attachments)
What is more, Microsoft have developed the Dynamics 365 App for Outlook. The description for the app speaks of the Common Data Service (CDS) which is the old name for Dataverse. This app allows a user to push emails, Contacts and meetings to Dataverse so it is centrally managed and visible to the wider organisation. Users can also refer to the information in Dataverse, as they write emails or set up meetings with customers, to see what other employees have done with those customers. The Dynamics 365 App for Outlook is the obvious replacement for the Business Contact Manager, the Outlook Customer Manager, and those BONA setups. We can see activity based on employees, customer contacts, or across entire customer organisations.
Licensing
The problem comes when we scratch the surface of licensing. Just what do we need to run the Dynamics 365 App for Outlook without running afoul of Microsoft licensing? The AppSource page is not clear, other than saying the product is free.
Fortunately, Microsoft provide lengthy tomes on their licensing. You can find the one for Power Platform here. 32 pages of fun which mentions Outlook three times but not the App. The other licensing guide which can help in these situations is the Dynamics 365 Licensing Guide. Twice the size but it does mention the App.
In short, if you have a Team Member license or a license for a Dynamics 365 Module, you are allowed to use the Dynamics 365 App for Outlook (see the first line in the table below).
So, for a small business dipping their toes into the Power Platform waters, a Team Members license is the obvious choice. It is hard to nail down formal pricing for a Team Member license but you are looking at around US$8 per user per month (compared to US$50 per user per month for Customer Service Pro).
Here is the problem. While Team Members gives us access to the Dynamics 365 App for Outlook, it only gives us read access to the Account table (also in the above table). We get full access to Activities, Contacts, and Notes but Account is the notable exception and the deal-breaker. Microsoft have moved from free tools for Contact Management through to requiring US$50 per user per month to achieve the same outcome.
The other option is to get a Team Members license and a Power App license, given a Power App license gives you full access to the “Core” Dataverse Tables, also known as the standard tables. A license for a Power App is US$5 per user per month. From the Power Platform Licensing Guide:
The combined Team Member + Power App license option may be tempting until we realise that configuring the Outlook App to meet our needs e.g. adding a field to the Contact form which we can see in Outlook is very restricted and described in undecipherable detail in the Dynamics 365 Licensing Guide’s Appendix C. In short, forget it.
With this confused and twisted licensing model, incrementally built up as products have evolved, Microsoft have raised massive barriers to small businesses looking to migrate to Power Platform for Contact Management. Microsoft are driving these organisations to competitors and decimating the organisation’s lifetime value to Microsoft’s bottom line.
I have literally done half a dozen demos of this functionality in the last few months to public and private organisations looking to manage their stakeholder interactions better and, as soon as the conversation comes to price and the insanity of the above licensing, the spark of joy of seeing exactly what they need fades from their eyes and is replaced with a phrase passing their lips around the theme of “<insert expletive> Microsoft licensing!”
The Obvious Solution
In this case, there are two obvious solutions. Option one is to give Team Members full access to those Standard tables in Dataverse, what are called the Common Data Model Core Entities/Tables.
If this was the case, a user would only need a Team Member license for Contact Management using Outlook and Dataverse.
The other option would be to grant Power App licensees access to Dynamics 365 App for Outlook. Then they would only need this license to smoothly transition to the world of the Dataverse. In fact, it could be argued that, with these kinds of adjustments to the Power App licenses, the Team Member license could be scrapped altogether. I am not saying I know Microsoft staff who would break down and cry tears of joy if the Team License disappeared but, if it did disappear, I might be taking a few boxes of Kleenex with me to hand out at the Microsoft offices.
With full access to the App and Dataverse, so many problems go away and the transition for a small business onto Power Platform and Dataverse becomes a simple process. Once there, their use of the services and features of the ecosystem will only increase. Whether it is turning on Dynamics 365 modules, building Power Apps, or making use of the Azure Services which are readily plugged into Dataverse through configuration, Microsoft would see revenue from these otherwise alienated customers and live up to their motto “to empower every person and every organization on the planet to achieve more”.